
Sooner or later, you will need to create a container image for your application. Normally, Docker is the go-to tool for this task, allowing you to build, ship, and run applications in containers. Unfortunately, Docker is not always available. For example, it may not be available inside a container without Docker-in-Docker or Docker-outside-Docker. In other cases, we may want to avoid building an image with Docker to ensure that the image is minimal and reproducible. This is especially important in production environments where security and performance are critical. Instead of building on a base image, we may want to create an image from scratch to ensure that it only contains the necessary files.
At the root of any process is the
OCI (Open Container Initiative) specification, which defines standards for crafting container images. To truly understand how container images work, this post will guide you through the process of manually creating an image without using Docker. We’ll rely on a few simple Unix tools – gzip, tar, and sha256sum.
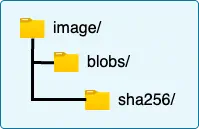
Step 1: Initialize the OCI layout
To start, you need a basic directory structure for the OCI image. We’ll build this inside of a directory named image. This directory will contain all the necessary files and directories to define the image. The OCI specification requires a specific layout:
To do that, run the command:
1mkdir -p image/blobs/sha256Next, create a file named oci-layout in the image directory to define the version of the specification that you’re implementing.
1echo '{ "imageLayoutVersion": "1.0.1" }' > image/oci-layoutyou now have the basic structure of the image. Next, you will populate it with some files.
Step 2: Prepare the root filesystem
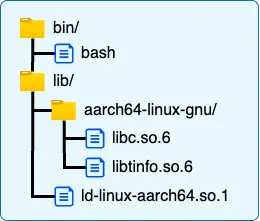
Now, let’s assume that the file system you want to create is stored in rootfs/. You want a minimal image with just bash and its dependencies. You can identify the dependencies using ldd. For example, running this on an Ubuntu (ARM64) system:
The first file can be ignored as it is a virtual dynamic shared object (VDSO). It is not a real file and represents a kernel interface that is automatically provided to the application. The rest of the files are the actual dependencies. Copy those to the rootfs directory. It should look like this:
If you want to be able to automate this process, you can use a script to find and copy the dependencies. Here’s a simple example of how you can do that:
 1LIBS_TO_COPY=$(ldd $(which bash) | \
 2                   gawk '/=>/{print $3}; !/=>/{print $1}' | \
 3                   grep -v '^$' | \
 4                   grep -v 'linux-vdso.so.1' | \
 5                   sort -u) && \
 6    for lib in $LIBS_TO_COPY; do \
 7        if [ -f "$lib" ]; then \
 8            # Construct the target path within the /image structure.
 9            # Example: for /lib/x86_64-linux-gnu/libc.so.6, target_path becomes /image/lib/x86_64-linux-gnu
10            TARGET_PATH="/rootfs$(dirname "$lib")"; \
11            mkdir -p "$TARGET_PATH"; \
12            cp "$lib" "$TARGET_PATH/"; \
13        fi; \
14    done
These files will have their current attributes, including the owner root. You can validate this using ls -l. You will need to put a few files in the /etc directory to define that user (and group) for the image. Otherwise, you will get an error when you run the container:
1docker: Error response from daemon: failed to create task for container: failed to create shim task: OCI runtime create failed: runc create failed: unable to start container process: error during container init: exec: "/bin/bash": permission denied: unknownThe files you need to create are:
rootfs/etc/passwd:root:x:0:0:root:/root:/bin/bashrootfs/etc/group:root:x:0:
You now have a basic file system for bash. Create a tarball of the root filesystem and then compress it. For now, you will need to keep both the uncompressed and compressed versions of the tarball.
Step 3: Building the layers
An OCI image is similar to a Git repository: it stores the data as SHA checksums. You can use sha256sum to calculate the checksums of the tarball and the compressed tarball. It will return data in the format <SHA> <FILENAME>. Since you only need the SHA portion, you can use cut too extract it:
At this point, the .tar file is no longer needed. We just needed to calculate the SHA. The compressed tarball is the one that will be used in the image. Move the compressed tarball to the blobs/sha256 directory and rename it based on its SHA checksum.
Step 3: Create the image configuration file
Now you need to create a configuration file for the layer. This file will contain the metadata required to use the layer. This is where most of the key information about the image is stored. Create a file named layer.json in the image/blobs/sha256 directory:
Notice that the image configuration file needs to includes the SHA for the uncompressed tarball, not the compressed one. This enables the runtime to validate the uncompressed contents. Now, you need to calculate the SHA256 checksum for this file:
1LAYER_CONFIG_SHA=$(sha256sum image/blobs/sha256/layer.json | cut -d " " -f1)Using that SHA, rename the layer.json file to match the checksum:
1mv image/blobs/sha256/layer.json image/blobs/sha256/${LAYER_CONFIG_SHA}Step 4: Create the Manifest File
Now you need to create a manifest file that describes the layers that make up the image. Since this is a single-layer image, the manifest will reference the image configuration and the layer tarball. It needs to provide the SHA and file size for both components. Notice that in this case, the manifest file uses the compressed tarball SHA since it’s describing the layer file that was stored.
We can create this using bash:
 1cat << EOF > image/blobs/sha256/manifest.json
 2{
 3  "schemaVersion": 2,
 4  "config": {
 5    "mediaType": "application/vnd.oci.image.config.v1+json",
 6    "digest": "sha256:${LAYER_CONFIG_SHA}"
 7    "size": $(du --bytes image/blobs/sha256/${LAYER_CONFIG_SHA} | cut -f1),
 8  },
 9  "layers": [
10    {
11      "mediaType": "application/vnd.oci.image.layer.v1.tar+gzip",
12      "digest": "sha256:${LAYER_TARGZ_SHA}"
13      "size": $(du --bytes image/blobs/sha256/${LAYER_TARGZ_SHA} | cut -f1),
14    }
15  ]
16}
17EOF
Just like before, you need to calculate the SHA256 checksum of the manifest file and then rename the file to match its checksum:
Step 5: Create the image index
Now that we have defined the layers and their manifest, we can finally write the index file that describes the image as a whole. This file will reference the manifest file (or for a multi-platform image, multiple manifests). The index file is stored at the root of the OCI package.
1cat << EOF > image/index.json
2{
3 "schemaVersion": 2,
4 "manifests": [
5 {
6 "mediaType": "application/vnd.oci.image.manifest.v1+json",
7 "digest": "sha256:${MANIFEST_SHA}",
8 "size": $(du --bytes image/blobs/sha256/${MANIFEST_SHA} | cut -f1),
9 "platform": {
10 "architecture": "arm64",
11 "os": "linux"
12 }
13 }
14 ]
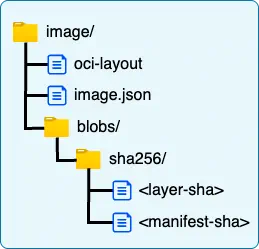
15EOFYou should now have a complete OCI image structure that looks like this:
Step 6: Package the OCI image
Now that you have build the layer, configuration file, manifest, and index, you’re ready to package the final OCI image. Simply create a tarball of the OCI image:
1tar -cf image.tar -C image .You can now use tools like
skopeo to push the image to a container registry and make it available to test. For example, skopeo copy oci-archive:image.tar docker://myregistry/myimage:latest will push the image to a Docker registry.
The Dockerfile equivalent
To help make this process easier to understand, this is the equivalent Dockerfile that would produce the same image:
Each step in the Dockerfile corresponds to a layer in the OCI image. The FROM scratch line indicates that the image starts from an empty base, and the COPY command adds the contents of the rootfs/ directory to the root of the image. Exported as an OCI image, it creates a single layer (tar.gz) with all of the files that were in the rootfs/ directory, along with the necessary metadata in the manifest and index files. As you learned earlier, the ENV and ENTRYPOINT metadata is included in the image configuration file.
When you execute RUN commands, each one is creating a new layer with the files that were created, deleted, or modified in that step. If you’re curious how that aspect works, make sure to read
Understanding Container Image Layers.
Its important to understand that when files are deleted, they are not removed from the image. Instead,
whiteout files are created and included in that layer to indicate that the file/directory was deleted. For example, if you deleted /bin/bash in a RUN command, the new layer would include a file called .wh.bash in the /bin directory.
If you wanted to reproduce the entire process inside of Dockerfiles — including capturing bash, the Dockerfile might be substantially longer. You can expand this section if you're interested in those details...
To do everything we've discussed so far, you would use a multi-stage Dockerfile. The first stage collects all the necessary files, and the second stage creates a final image using `scratch` using just the files collected in the first stage. Here's how that would look:
 1# Stage 1: builder
 2# This stage uses a full Ubuntu image to identify and collect all necessary files
 3# for the bash executable and its dynamic libraries.
 4FROM ubuntu:latest AS builder
 5
 6# Update package lists and install bash.
 7# We also install 'gawk' and 'coreutils' as 'awk' and 'sort' for the dependency
 8# collection logic, ensuring they are available.
 9# '--no-install-recommends' helps keep this stage as lean as possible.
10RUN apt-get update \
11    && apt-get install -y bash gawk coreutils --no-install-recommends \
12    && rm -rf /var/lib/apt/lists/*
13
14# Create a temporary root filesystem structure where all collected files will be stored.
15# This ensures that when we copy them to the scratch image, they land in the correct
16# absolute paths (e.g., /bin, /lib, /lib64).
17RUN mkdir -p /image/bin /image/lib /image/etc
18
19# Copy the bash executable into our temporary root filesystem.
20RUN cp /bin/bash /image/bin/bash
21
22# Find all dynamic libraries that /bin/bash depends on using 'ldd'.
23# The 'ldd' command outputs a list of shared libraries and their full paths.
24#
25# Logic:
26# 1. `ldd /bin/bash`: Lists all dependencies.
27# 2. `awk '/=>/{print $3}; !/=>/{print $1}'`: Parses the output.
28#    - For lines with "=>" (e.g., `libtinfo.so.6 => /lib/x86_64-linux-gnu/libtinfo.so.6`),
29#      it prints the third field, which is the full path.
30#    - For lines without "=>" (e.g., `/lib64/ld-linux-x86-64.so.2 (0x...)`, which is the dynamic linker),
31#      it prints the first field, which is the full path.
32# 3. `grep -v '^$'`: Removes any empty lines.
33# 4. `grep -v 'linux-vdso.so.1'`: Excludes 'linux-vdso.so.1', which is a kernel-provided
34#    virtual dynamic shared object and not a file to be copied.
35# 5. `sort -u`: Sorts the list and removes duplicates, ensuring each library is processed once.
36#
37# The script then iterates through the collected library paths:
38#   - It checks if the library file actually exists (`[ -f "$lib" ]`).
39#   - It determines the target directory within '/image' (e.g., /image/lib/x86_64-linux-gnu).
40#   - It creates that target directory if it doesn't exist.
41#   - It copies the library into the appropriate directory.
42RUN LIBS_TO_COPY=$(ldd /bin/bash | \
43                   gawk '/=>/{print $3}; !/=>/{print $1}' | \
44                   grep -v '^$' | \
45                   grep -v 'linux-vdso.so.1' | \
46                   sort -u) && \
47    for lib in $LIBS_TO_COPY; do \
48        if [ -f "$lib" ]; then \
49            # Construct the target path within the /image structure.
50            # Example: for /lib/x86_64-linux-gnu/libc.so.6, target_path becomes /image/lib/x86_64-linux-gnu
51            TARGET_PATH="/image$(dirname "$lib")"; \
52            mkdir -p "$TARGET_PATH"; \
53            cp "$lib" "$TARGET_PATH/"; \
54        fi; \
55    done
56
57# Copy minimal /etc files. These are crucial for even basic shell functionality,
58# as bash often tries to look up user information.
59# - /etc/passwd: Provides basic user information (root user).
60# - /etc/group: Provides basic group information (root group).
61# - /etc/nsswitch.conf: Defines how system databases (like passwd, group, hosts) are looked up.
62#   "hosts: files dns" is a common minimal entry.
63RUN echo 'root:x:0:0:root:/root:/bin/bash' > /image/etc/passwd \
64    && echo 'root:x:0:' > /image/etc/group
65
66################################################################################
67# That's a lot of layers! You don't want all of these files, so you can
68# use a second stage to build the final image with just the files you need.
69################################################################################
70
71# Stage 2: final-image
72# This stage uses 'scratch', the smallest possible base image, which is completely empty.
73FROM scratch
74
75# Set the working directory to the root of the image.
76WORKDIR /
77
78# Copy all the collected files from the 'builder' stage into the root
79# of this new 'scratch' image.
80COPY --from=builder /image /
81
82# Set the entrypoint to the bash executable.
83# This means when the container starts, it will automatically run /bin/bash.
84ENTRYPOINT ["/bin/bash"]
85
86# And set the environment variable PATH to include /bin. That way, we don't
87# strictly need to call `/bin/bash` to find the executable
88ENV PATH=/bin
Conclusion
Building OCI images without Docker gives you a deeper understanding of how container images work and provides full control over the image creation process. By leveraging standard Unix tools and the OCI specification, you can produce minimal, secure, and highly reproducible images tailored to your needs. This approach is especially valuable in environments where Docker is unavailable or undesirable, and it empowers you to automate and customize your build pipelines beyond the limitations of traditional tools. As the container ecosystem evolves, mastering these fundamentals ensures you can create secure images that meet your needs.