
When you’re running CI/CD workflows on GitHub-hosted runners, you’re in a pretty open environment. By default, the runner can reach any domain on the internet. That flexibility is great for velocity, but it can be a concern when you need tighter egress control.
In this guide you’ll configure the runner to resolve only the domains you explicitly allow (plus the domains GitHub Actions needs to function). I’ll show you each piece so you understand how it works and can adapt it.
The examples assume Ubuntu 24.04 (the current GitHub-hosted runner image), but the concepts apply to any Linux environment. If you need deeper control on GitHub, consider VNet‑injected larger hosted runners. That lets you control the virtual network around the runner without managing your own fleet.
Starting the script
Create a script to encapsulate the logic so you can configure and test quickly. Make it executable with chmod +x script.sh. Here’s the start:
Nothing surprising. The script uses set -e to exit immediately if a command fails (good for reliability). DEBIAN_FRONTEND=noninteractive prevents prompts from processes like apt-get. It then installs curl and jq for fetching/parsing GitHub’s API and (most importantly) unbound.
DNS filtering with Unbound
The first step in restricting network access is controlling DNS resolution. Most network connections start with a DNS lookup, converting a name like kenmuse.com into an IP address. If a process can’t resolve a domain name to an IP address, it won’t be able to connect to that site. By controlling this lookup, you can control which domains can be reached.
To do this, you want a DNS resolver that can filter queries based on an allowlist. Unbound is a validating, recursive, caching DNS resolver that fits our requirements. It runs locally, is highly configurable, and supports DNSSEC. After all, you don’t want the solution to weaken security!
Discovering the upstream DNS servers
Ubuntu (and the GitHub-hosted runners) use systemd-resolved for DNS management. It performs local caching and forwards queries it can’t answer to upstream DNS servers provided by DHCP. Before you add your own resolver, you must capture those upstream servers so you can forward your queries. Otherwise you could lose access to internal DNS zones.
The easy way to do this is to use resolvectl status and parse the response (in the future,
this issue should make that easier). This shows the current DNS configuration. You can then use grep to extract the relevant information:
  1   echo "🔍 Detecting original upstream DNS servers from systemd-resolved..."
  2   RESOLVE_CTL_STATUS=$(resolvectl status)
  3   UPSTREAM_DNS=$(echo "$RESOLVE_CTL_STATUS" | grep -oP 'DNS Servers: \K.*')
  4   DNS_DOMAIN=$(echo "$RESOLVE_CTL_STATUS" | grep -oP 'DNS Domain: \K.*')
  5
  6   if [ -z "$UPSTREAM_DNS" ]; then
  7       echo "❌ ERROR: Could not determine upstream DNS servers. Exiting."
  8       exit 1
  9   fi
 10   echo "✅ Found upstream DNS servers: $UPSTREAM_DNS"
 11   if [ -n "$DNS_DOMAIN" ]; then
 12       echo "✅ Found search domain: $DNS_DOMAIN"
 13   fi
The grep command will output only the matching details (-o) from a Perl-compatible regex (-P) that extracts the values. The \K in the pattern is clever – it tells grep to “forget” everything matched up to that point, so we only capture what comes after “DNS Servers: " or “DNS Domain: “. And the .* captures everything after that until the end of the line.
If you can’t find upstream DNS servers, the script exits. There’s no point continuing without somewhere to forward allowed queries. You could choose a fallback public resolver (like 1.1.1.1) if you do not need internal name resolution.
Azure’s resolv.conf configuration
Since the GitHub-hosted runners are on Azure, you can expect the resolv.conf to contain something like this:
The nameserver is using the default DNS resolver, forwarding requests to the upstream DNS servers that are provided by DHCP. The two options, edns0 (Extension Mechanisms for DNS 0) and trust-ad (Trust All DNSSEC Authenticated Data), are related to DNS extensions and security. This indicates that the system should consider the AD bit as a reliable indicator of DNSSEC validation. The search line indicates the default search domain for DNS queries, which is specific to the Azure subscription/region/virtual network.
Configuring Unbound as a filtering DNS resolver
Now configure Unbound to act as a local DNS resolver that filters queries based on an allowlist:
  1   echo "Configuring Unbound to forward allowed traffic..."
  2
  3   cat <<EOF > /etc/unbound/unbound.conf
  4   server:
  5       interface: 127.0.0.1
  6       access-control: 127.0.0.0/8 allow
  7       hide-identity: yes
  8       hide-version: yes
  9       harden-dnssec-stripped: yes
 10       auto-trust-anchor-file: "/var/lib/unbound/root.key"
 11       include: "/etc/unbound/allowlist.conf"
 12
 13       forward-zone:
 14           name: "."
 15   EOF
 16
 17   for ip in $UPSTREAM_DNS; do
 18       echo "        forward-addr: $ip" >> /etc/unbound/unbound.conf
 19   done
Let me break down what each setting does:
interface: 127.0.0.1: Unbound only listens on localhost. We don’t want external systems making DNS queries through our runner.access-control: 127.0.0.0/8 allow: Only processes calling from the local machine can make DNS queries.hide-identity: yesandhide-version: yes: Don’t reveal information about our DNS server to queries. This prevents fingerprinting the system.harden-dnssec-stripped: yes: If DNSSEC (Domain Name System Security Extensions) data is removed from a response, reject it. This protects against downgrade attacks.auto-trust-anchor-file: Automatically maintain DNSSEC trust anchors for validation. When you installed Unbound, that root key file was created for you.include: "/etc/unbound/allowlist.conf": This is where you’ll define which domains are allowed and denied.
The forward-zone with name: "." means “for the root zone (all domains), forward queries to these servers.” The script then appends each upstream DNS server from the last step. In other words, for any DNS query that is allowed, Unbound will ask the original DNS servers to resolve the queries. In a way, we’re using Unbound as a proxy between the applications on the runner and the upstream DNS servers.
Building the domain allowlist
Now that Unbound is configured, you define which domains are allowed. That’s done in /etc/unbound/allowlist.conf, included from the main configuration. First deny everything, then add specific exceptions:
  1   echo "Creating domain allowlist..."
  2   cat <<EOF > /etc/unbound/allowlist.conf
  3   # Deny all domains by default
  4   local-zone: "." refuse
  5
  6   # Static allowlist rules
  7   local-zone: "kenmuse.com" transparent
  8   EOF
  9
 10   if [ -n "$DNS_DOMAIN" ]; then
 11       echo "# Allow internal search domain" >> /etc/unbound/allowlist.conf
 12       echo "local-zone: \"$DNS_DOMAIN\" transparent" >> /etc/unbound/allowlist.conf
 13   fi
The local-zone: "." refuse line is crucial – it tells Unbound to refuse queries for any domain by default. This is our “deny all” rule. By denying everything first, you ensure that only explicitly allowed domains can be resolved. Next, you add specific domains to allow using local-zone directives with the transparent type. When a zone is marked as transparent, Unbound forwards the query to the upstream DNS servers. This effectively creates an allowlist entry. If you’re interested, there are a lot
more options for local-zone types.
In this example you allow:
kenmuse.com— Example trusted domain.
Many environments also have an internal search domain, allowing you to resolve internal hostnames without the full domain. If a search domain was detected, add it.
Adding GitHub Actions domains dynamically
GitHub Actions needs to communicate with various GitHub services. If you don’t allow these domains, your Actions workflow will likely fail (or worse, the workflow will trigger but suddenly become uncontrollable). One challenge here is that GitHub uses a variety of domains for different services, and these can change over time. Manually maintaining a list would be tedious and error-prone. Fortunately, GitHub publishes the list of domains used by Actions through their API.
You can fetch and add these automatically:
This is pretty elegant. We fetch the /meta endpoint from GitHub’s API, which returns JSON data about their services. Then we use jq to:
- Navigate to
.domains.actions_inbound.full_domains[](an array of domain names) - For each domain, format it as an Unbound
local-zonedirective - Append these rules to our allowlist
This ensures Actions can reach services like artifact storage, cache servers, and OIDC (OpenID Connect) providers without manual maintenance. The GitHub documentation lists the mandatory domains, and the API helps you to keep current.
What about the time server?
If you run chronyc sources on the runner, you’ll see an output like this:
The time source PHC0 indicates that chrony is using PTP Hardware Clock for time synchronization. It’s a clock that is part of a network adapter and is used to implement the Precision Time Protocol (PTP). The hardware is synchronized to a highly accurate time source, often provided by the network infrastructure. Because of this, you don’t need to allow NTP (Network Time Protocol) servers in your DNS allowlist.
Switching systemd-resolved to use our DNS
Next tell the system to use the new Unbound resolver. (You can start Unbound right after writing its config to eliminate any brief gap where DNS points at 127.0.0.1 before Unbound is running.)
The DNS=127.0.0.1 setting points all DNS queries to our local Unbound instance. The DNSStubListener=no is important – it stops systemd-resolved from listening on 127.0.0.53, which would conflict with Unbound’s use of localhost. Without this, applications could potentially bypass our filter by directly querying 127.0.0.53.
After restarting systemd-resolved, update /etc/resolv.conf to point to /run/systemd/resolve/resolv.conf (not stub-resolv.conf). That file now contains nameserver 127.0.0.1, directing all DNS queries through Unbound. The original search domain (for example, the Azure internal domain) remains and was added to the allowlist earlier.
At this point, any DNS query made by applications on the runner will go through Unbound, which will only allow queries for domains in our allowlist.
Starting Unbound
If you’re sending queries to Unbound you need the service running.
On a runner, systemctl enable unbound is not strictly necessary since the runner is ephemeral, but it doesn’t hurt. That command is required any time the environment you’re using could be restarted. It ensures the service will be automatically started. The systemctl restart unbound ensures Unbound starts with the new configuration.
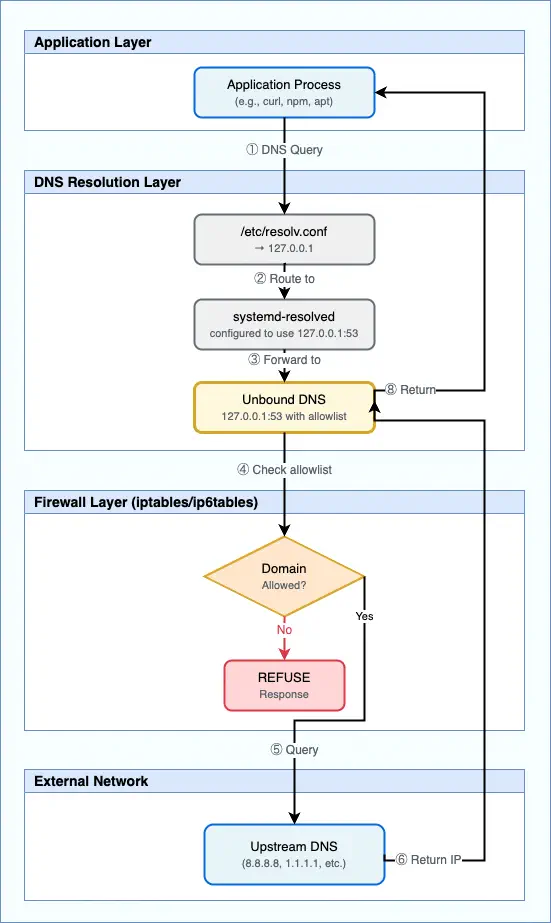
Visualizing the workflow
To make it clearer, here’s a simplified flow of how DNS queries are handled after this configuration:
Testing DNS filtering
If you install dnsutils (apt-get install -y dnsutils), you can use the dig command to test DNS resolution. For example:
1 dig +noall +answer kenmuse.comShould return details about the current DNS configuration for the site. If you try to resolve a domain that’s not in the allowlist, like microsoft.com:
1 dig +noall +answer microsoft.comYou should see an empty answer (no records), indicating the query was refused.
Next steps
At this point DNS resolution is restricted: any attempt to resolve a domain not in the allowlist fails. But you still have a gap — an application can connect directly to an IP address or talk to an external DNS resolver (including DoH). You’ll close those loopholes in the next post.