
In the last post you locked down network egress by restricting DNS resolution to an allowlist of domains. That’s a great first step, but it doesn’t fully solve the problem. An application can still bypass the DNS filter by connecting directly to an IP address or by using an external DNS resolver. In this post you’ll close those loopholes.
As before, these techniques apply to any Linux environment. If you need deeper control on GitHub, consider VNet‑injected larger hosted runners for broader network governance.
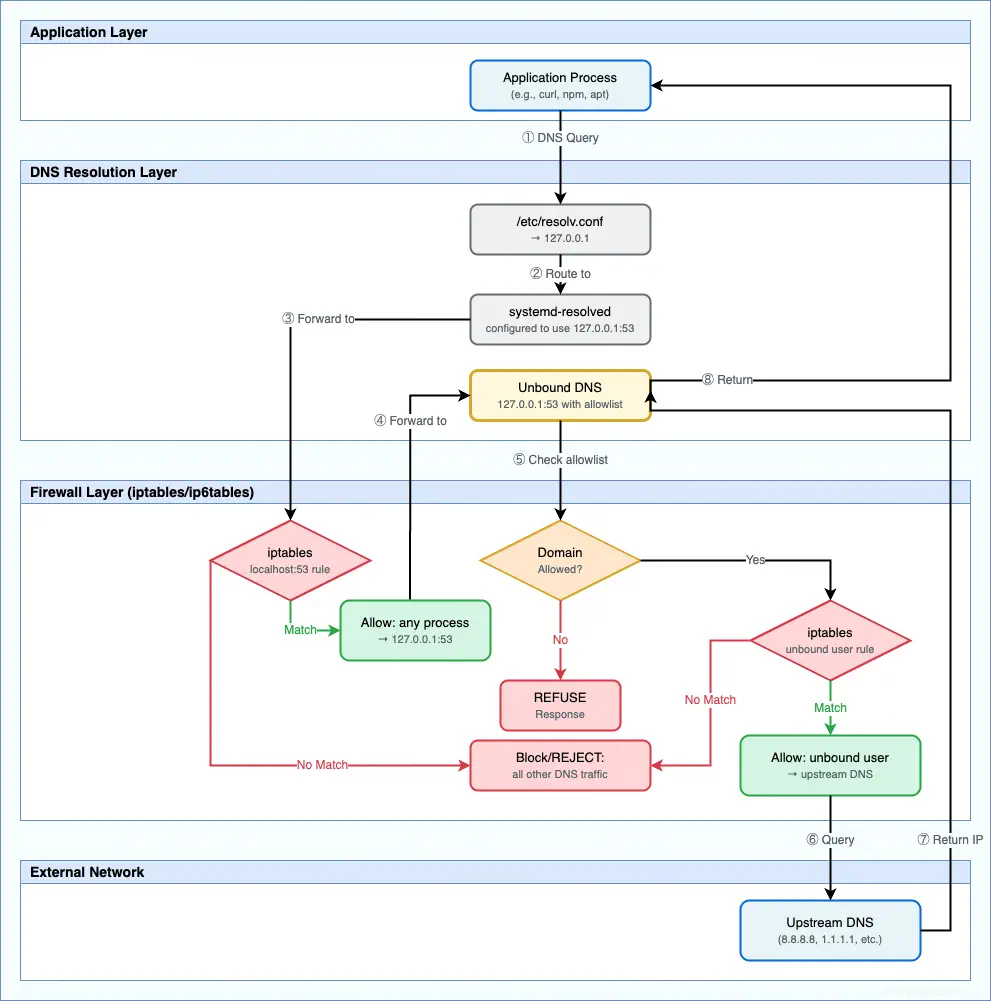
Restricting DNS traffic
Here’s the problem: even though you configured the system to use the filtering DNS resolver, nothing stops a process from making DNS queries directly to external DNS servers. A determined script can bypass Unbound by talking to 8.8.8.8 (Google) or 1.1.1.1 (Cloudflare) directly.
Linux gives you a powerful tool to control traffic at the packet level: iptables. You can block outbound DNS traffic that doesn’t originate from the Unbound service. These queries normally use the standard port for DNS, port 53 (UDP and TCP).
Use firewall rules to enforce DNS restrictions at the network layer:
These rules allow the unbound user (the system user that runs the Unbound service) to make DNS queries to any destination. Here’s what each part means:
-A OUTPUT- Append to the OUTPUT chain (rules for outbound traffic from this machine)
-p udp/-p tcp- Match UDP or TCP protocol (DNS uses both)
-m owner --uid-owner unbound- Match packets from processes running as the
unbounduser
-d 0/0- Destination of any IP address (0/0 is CIDR notation for “all addresses”)
--dport 53- Destination port 53 (the standard DNS port)
-j ACCEPT- Jump to ACCEPT (allow the packet)
At this point Unbound can query upstream servers, but nothing else can. Next allow applications on the system itself to query Unbound:
These rules allow any process to query localhost port 53 — where Unbound listens. That’s how applications on the runner will send DNS queries through the filter.
The final rules enforce the policy: reject any other DNS traffic. If a process queries an external DNS server directly, the rules block it.
The REJECT target matters. It sends a quick failure (connection refused) so applications fail fast. DROP would make them linger until a timeout before they ultimately fail the request.
Handling IPv6 DNS queries
There’s another consideration: IPv6. Modern systems are dual-stack. The iptables rules only cover IPv4. As a result, you need to add equivalent rules for IPv6 using ip6tables:
  1   # Allow the 'unbound' user to make outbound DNS queries over IPv6
  2   ip6tables -A OUTPUT -p udp -m owner --uid-owner unbound -d ::/0 --dport 53 -j ACCEPT
  3   ip6tables -A OUTPUT -p tcp -m owner --uid-owner unbound -d ::/0 --dport 53 -j ACCEPT
  4
  5   # Allow DNS queries to localhost over IPv6 (system -> unbound)
  6   ip6tables -A OUTPUT -p udp -d ::1 --dport 53 -j ACCEPT
  7   ip6tables -A OUTPUT -p tcp -d ::1 --dport 53 -j ACCEPT
  8
  9   # Block all other outbound IPv6 DNS traffic
 10   ip6tables -A OUTPUT -p udp --dport 53 -j REJECT
 11   ip6tables -A OUTPUT -p tcp --dport 53 -j REJECT
These rules are nearly identical to the IPv4 version, with two key differences:
::/0instead of0/0- This is IPv6 CIDR notation for “all addresses”
::1instead of127.0.0.1- This is the IPv6 loopback address (equivalent to 127.0.0.1 in IPv4)
Without these rules, an application can bypass filtering by sending DNS queries over IPv6.
Closing the DNS-over-HTTPS loophole
It turns out there’s another bypass path: DNS-over-HTTPS (DoH). Some tools (including browsers and security agents) now encrypt DNS queries and send them over HTTPS to providers like Cloudflare or Google. This improves privacy and security, but it also bypasses local DNS settings in a way that’s tough to control.
Since DoH uses port 443, it looks like ordinary HTTPS. That means you can’t just block 443. Instead, you will need to block well-known DoH provider IP addresses.
Let’s add rules to block common DoH providers for both IPv4 and IPv6:
  1   # Block common DNS-over-HTTPS providers (IPv4)
  2   echo "Blocking DNS-over-HTTPS providers..."
  3
  4   # Cloudflare DoH
  5   iptables -A OUTPUT -d 1.1.1.1 -p tcp --dport 443 -j REJECT
  6   iptables -A OUTPUT -d 1.0.0.1 -p tcp --dport 443 -j REJECT
  7
  8   # Google DoH
  9   iptables -A OUTPUT -d 8.8.8.8 -p tcp --dport 443 -j REJECT
 10   iptables -A OUTPUT -d 8.8.4.4 -p tcp --dport 443 -j REJECT
 11
 12   # Quad9 DoH
 13   iptables -A OUTPUT -d 9.9.9.9 -p tcp --dport 443 -j REJECT
 14
 15   # Block common DNS-over-HTTPS providers (IPv6)
 16   ip6tables -A OUTPUT -d 2606:4700:4700::1111 -p tcp --dport 443 -j REJECT
 17   ip6tables -A OUTPUT -d 2606:4700:4700::1001 -p tcp --dport 443 -j REJECT
 18   ip6tables -A OUTPUT -d 2001:4860:4860::8888 -p tcp --dport 443 -j REJECT
 19   ip6tables -A OUTPUT -d 2001:4860:4860::8844 -p tcp --dport 443 -j REJECT
 20   ip6tables -A OUTPUT -d 2620:fe::fe -p tcp --dport 443 -j REJECT
These rules target the well-known IP addresses of popular DoH services. When an application connects to these IPs on port 443, the connection is rejected.
This approach isn’t perfect. There are many DoH providers and applications can pick custom endpoints. Blocking major providers removes the most common bypass paths, but a determined user can still find others.
You mean there’s more?
The original goal was to restrict access to a specific set of domains. At this point DNS resolution is locked down, direct DNS queries are blocked, and common DoH providers are rejected. You could go further by allowing outbound traffic only to the IP addresses for your allowed domains. Using dig (from dnsutils), query IP addresses for each allowed domain and build iptables rules from that data. For example:
Downside: many domains use CDNs, load balancers, dynamic IPs, or AnyCast (which provides IPs that route to the closest available server). IPs can change frequently or differ by region. A domain could also map to a large rotating pool, making it impractical to enumerate everything.
If jobs are short, you might start and finish before the domain cache expires or the addresses could change. Long-running jobs face a higher risk of mid-run IP changes. This adds complexity and maintenance overhead. You’ll need to weigh security benefits versus the operational challenges. You have full admin control, so you can script dynamic updates as needed.
Locking down files
To harden further, lock down the DNS configuration files by marking them immutable with chattr:
This prevents changes (even by root) until the immutable flag is removed. Root can still revert it, but it adds friction against accidental or opportunistic edits.
A complete workflow
Putting this together, the workflow looks like this:
The complete script
Here’s a script that implements the DNS filtering (from the prior post) plus the firewall restrictions. (If you prefer zero downtime during the switch, start Unbound before re-pointing systemd-resolved.)
  1#!/bin/bash
  2
  3# Exit immediately if a command exits with a non-zero status.
  4set -e
  5export DEBIAN_FRONTEND=noninteractive
  6
  7echo "🚀 Starting Unbound DNS firewall setup for Ubuntu 24.04..."
  8
  9# --- Step 1: Install dependencies ---
  10   echo "Installing unbound, curl, and jq..."
  11   apt-get update > /dev/null
  12   apt-get install -y unbound curl jq dnsutils
  13
  14   # --- Step 2: Discover original DNS configuration ---
  15   echo "🔍 Detecting original upstream DNS servers from systemd-resolved..."
  16   RESOLVECTL_STATUS=$(resolvectl status)
  17   UPSTREAM_DNS=$(echo "$RESOLVECTL_STATUS" | grep -oP 'DNS Servers: \K.*')
  18   DNS_DOMAIN=$(echo "$RESOLVECTL_STATUS" | grep -oP 'DNS Domain: \K.*')
  19
  20   if [ -z "$UPSTREAM_DNS" ]; then
  21       echo "❌ ERROR: Could not determine upstream DNS servers. Exiting."
  22       exit 1
  23   fi
  24   echo "✅ Found upstream DNS servers: $UPSTREAM_DNS"
  25   if [ -n "$DNS_DOMAIN" ]; then
  26       echo "✅ Found search domain: $DNS_DOMAIN"
  27   fi
  28
  29   # --- Step 3: Configure Unbound ---
  30   echo "Configuring Unbound to forward allowed traffic..."
  31
  32   cat <<EOF > /etc/unbound/unbound.conf
  33   server:
  34       interface: 127.0.0.1
  35       access-control: 127.0.0.0/8 allow
  36       hide-identity: yes
  37       hide-version: yes
  38       harden-dnssec-stripped: yes
  39       auto-trust-anchor-file: "/var/lib/unbound/root.key"
  40       # Include our custom allowlist rules
  41       include: "/etc/unbound/allowlist.conf"
  42
  43       # Forward all allowed queries to the original upstream DNS servers.
  44       forward-zone:
  45           name: "."
  46   EOF
  47
  48   for ip in $UPSTREAM_DNS; do
  49       echo "        forward-addr: $ip" >> /etc/unbound/unbound.conf
  50   done
  51
  52   # --- Step 4: Create the allowlist ---
  53   echo "Creating domain allowlist..."
  54   cat <<EOF > /etc/unbound/allowlist.conf
  55   # Deny all domains by default
  56   local-zone: "." refuse
  57
  58   # Static allowlist rules
  59   local-zone: "kenmuse.com" transparent
  60   EOF
  61
  62   # If an internal search domain was found, add it to the allowlist
  63   if [ -n "$DNS_DOMAIN" ]; then
  64       echo "# Allow internal search domain" >> /etc/unbound/allowlist.conf
  65       echo "local-zone: \"$DNS_DOMAIN\" transparent" >> /etc/unbound/allowlist.conf
  66   fi
  67
  68   # --- Step 5: Add GitHub Actions domains to allowlist ---
  69   echo "Fetching and adding GitHub Actions domains..."
  70   curl -s https://api.github.com/meta | \
  71       jq -r '.domains.actions_inbound.full_domains[] | "local-zone: \"\(.)\" transparent"' \
  72       >> /etc/unbound/allowlist.conf
  73
  74   # --- Step 6: (Optional) Validate and start Unbound early
  75   echo "Validating Unbound config syntax..."
  76   unbound-checkconf /etc/unbound/unbound.conf
  77   systemctl restart unbound
  78
  79   # --- Step 7: Configure systemd-resolved ---
  80   echo "Configuring systemd-resolved to use local Unbound..."
  81   # This tells the OS to send all DNS queries to our Unbound instance
  82   cat <<EOF > /etc/systemd/resolved.conf
  83   [Resolve]
  84   DNS=127.0.0.1
  85   DNSStubListener=no
  86   EOF
  87
  88   systemctl restart systemd-resolved
  89   rm -f /etc/resolv.conf
  90   ln -s /run/systemd/resolve/resolv.conf /etc/resolv.conf
  91
  92   # If you did not start Unbound earlier, start now
  93   echo "Ensuring Unbound is running..."
  94   systemctl restart unbound
  95   echo "✅ Unbound configuration complete!"
  96
  97   # --- Step 8: Configure iptables for IPv4 DNS ---
  98   echo "Configuring iptables rules..."
  99
 100   # Allow the 'unbound' user to make outbound DNS queries
 101   iptables -A OUTPUT -p udp -m owner --uid-owner unbound -d 0/0 --dport 53 -j ACCEPT
 102   iptables -A OUTPUT -p tcp -m owner --uid-owner unbound -d 0/0 --dport 53 -j ACCEPT
 103
 104   # Allow DNS queries on the loopback interface (system -> unbound)
 105   iptables -A OUTPUT -p udp -d 127.0.0.1 --dport 53 -j ACCEPT
 106   iptables -A OUTPUT -p tcp -d 127.0.0.1 --dport 53 -j ACCEPT
 107
 108   # Block all other outbound DNS traffic
 109   iptables -A OUTPUT -p udp --dport 53 -j REJECT
 110   iptables -A OUTPUT -p tcp --dport 53 -j REJECT
 111
 112   echo "✅ iptables configuration complete!"
 113
 114   # --- Step 9: Configure ip6tables for IPv6 DNS ---
 115   echo "Configuring ip6tables rules..."
 116
 117   # Allow the 'unbound' user to make outbound DNS queries over IPv6
 118   ip6tables -A OUTPUT -p udp -m owner --uid-owner unbound -d ::/0 --dport 53 -j ACCEPT
 119   ip6tables -A OUTPUT -p tcp -m owner --uid-owner unbound -d ::/0 --dport 53 -j ACCEPT
 120
 121   # Allow DNS queries to localhost over IPv6 (system -> unbound)
 122   ip6tables -A OUTPUT -p udp -d ::1 --dport 53 -j ACCEPT
 123   ip6tables -A OUTPUT -p tcp -d ::1 --dport 53 -j ACCEPT
 124
 125   # Block all other outbound IPv6 DNS traffic
 126   ip6tables -A OUTPUT -p udp --dport 53 -j REJECT
 127   ip6tables -A OUTPUT -p tcp --dport 53 -j REJECT
 128
 129   echo "✅ ip6tables configuration complete!"
 130
 131   # --- Step 10: Block DNS-over-HTTPS ---
 132   echo "Blocking DNS-over-HTTPS providers..."
 133
 134   # Cloudflare DoH (IPv4)
 135   iptables -A OUTPUT -d 1.1.1.1 -p tcp --dport 443 -j REJECT
 136   iptables -A OUTPUT -d 1.0.0.1 -p tcp --dport 443 -j REJECT
 137
 138   # Google DoH (IPv4)
 139   iptables -A OUTPUT -d 8.8.8.8 -p tcp --dport 443 -j REJECT
 140   iptables -A OUTPUT -d 8.8.4.4 -p tcp --dport 443 -j REJECT
 141
 142   # Quad9 DoH (IPv4)
 143   iptables -A OUTPUT -d 9.9.9.9 -p tcp --dport 443 -j REJECT
 144
 145   # Cloudflare DoH (IPv6)
 146   ip6tables -A OUTPUT -d 2606:4700:4700::1111 -p tcp --dport 443 -j REJECT
 147   ip6tables -A OUTPUT -d 2606:4700:4700::1001 -p tcp --dport 443 -j REJECT
 148
 149   # Google DoH (IPv6)
 150   ip6tables -A OUTPUT -d 2001:4860:4860::8888 -p tcp --dport 443 -j REJECT
 151   ip6tables -A OUTPUT -d 2001:4860:4860::8844 -p tcp --dport 443 -j REJECT
 152
 153   # Quad9 DoH (IPv6)
 154   ip6tables -A OUTPUT -d 2620:fe::fe -p tcp --dport 443 -j REJECT
 155
 156   echo "✅ DNS-over-HTTPS blocking complete!"
 157
 158   echo "🔐 Locking down configuration files..."
 159
 160   chattr +i /etc/unbound/unbound.conf
 161   chattr +i /etc/unbound/allowlist.conf
 162   chattr +i /etc/systemd/resolved.conf
 163
 164   echo "🎉 Network lockdown complete!"
Making it practical
Locking down network access on a runner is work, but it meaningfully improves security. By controlling which domains workflows can reach, you reduce the ability for malicious code to exfiltrate data or reach out to command-and-control servers.
There are many ways to manage and extend and improve these solutions. Tools like ipset manage large IP collections efficiently while VNet‑injected runners can leverage Network Security Groups (NSGs), firewalls, or appliances to move enforcement off the host or add extra layers to the security.
One of the most important aspects of this is making it easy to adopt, package and distribute. There are two good options for GitHub-hosted runners:
GitHub Action – Create a composite action that runs this script. You could even create a traditional Node.js Action and run your script as a pre-step, ensuring it runs before any other steps. Teams can then add a single step to their workflows, such as:
uses: your-org/restrict-network@v1. You can even enhance the script to accept a list of allowed domains as input parameters. This makes it flexible enough to use across different projects with different external dependencies.Pre-start Script – If you’re using self-hosted runners or custom runner images, you can include this as part of the runner initialization process. A pre-job script can be configured to run before any workflow jobs, ensuring every job starts with restricted network access.
The key is making it easy to adopt. If teams have to manually include and run a complex script, they’ll skip it. Security should be easy to adopt and integrate whenever possible. And while it’s hard to lock down a system completely – there are always edge cases – defense-in-depth is about layers. This approach adds a strong layer that makes your CI/CD environment more resilient.
And in today’s thread landscape, every layer counts.