
If you’ve been following along with the last few posts on Buildroot, you know the pain point: waiting for the toolchain to build. The majority of the build time – 20 minutes or more, depending on your CPU – comes from this step. But you don’t have to sit and watch the clock every time. There are three ways you can dramatically speed up your Buildroot workflow and get back to building the fun stuff.
Option 1: Build and reuse the SDK
A great way to save time is to build the SDK bundle once and reuse it for your toolchain. After the first build, Buildroot will cache the toolchain and all the necessary components, so you don’t have to rebuild everything from scratch every time. This is helpful if you’re working on adjusting the configuration or adding new packages, since you can skip building the toolchain and just focus on testing your changes.
It turns out that Buildroot has an additional feature that makes this even easier. You can generate a complete SDK that includes the toolchain, libraries, and all necessary tools in one go. This way, you can share the SDK with your team or use it across different machines without having to rebuild everything. You can then configure your Buildroot project to use this SDK as the toolchain, which will save you a lot of time in future builds.
To have Buildroot generate a complete SDK (Software Development Kit) that includes the toolchain and all necessary tools, just run:
1 make -C output -j`$(nproc)` sdkThis command creates an SDK bundle in the output/images directory. For example, if you’re building for an x86_64 architecture, you might find the SDK in output/images/x86_64-buildroot-linux-gnu_sdk-buildroot.tar.gz. This package contains everything you need to develop applications for your target system, including the toolchain, libraries, and headers. Be aware that it will be several hundred megabytes (or more) in size, depending on your configuration. It will also be specific to the host architecture and target architectures. That means that if you build it on an ARM machine to target x86_64, it will create binaries that only run on a similar ARM architecture and it will only generate x86_64 binaries.
To use the SDK in your project, you just need to update your Buildroot configuration to point to the SDK instead of building the toolchain from scratch. Run the following command to start the menu config interface:
1 make -C output nconfigUse the arrow keys to select Toolchain and press Enter.

Next, select Toolchain type and press Enter. Then choose External toolchain and press Enter again.


Then select Toolchain (Bootlin toolchains) and press Enter. Select Custom toolchain and press Enter again.


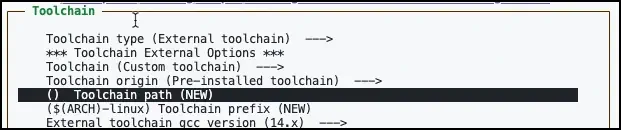
After that, select Toolchain origin and press Enter. Choose Toolchain to be downloaded and installed and press Enter again. This step allows Buildroot to use the .tar.gz bundle. If you don’t select this option, Buildroot will expect an unpackaged toolchain folder (and you’ll need to run the relocate-sdk.sh script in the bundle to set it up).
Now select Toolchain URL and press Enter. Because you want to use your .tar.gz SDK bundle, you need to provide a URL for the download. Since it’s a local file, you can use the file:// protocol, for example file:///path/to/sdks/x86_64-buildroot-linux-gnu_sdk-buildroot.tar.gz.
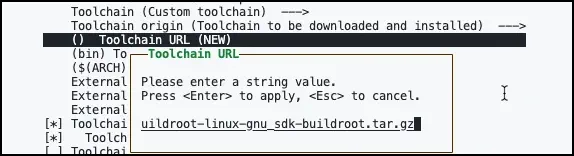
If you were using a preinstalled toolchain, the option would be called Toolchain path and you would enter the path to the toolchain folder instead.
Finally, you need to tell Buildroot about the SDK configuration so that it knows the versions of the various tools and libraries that will be available.
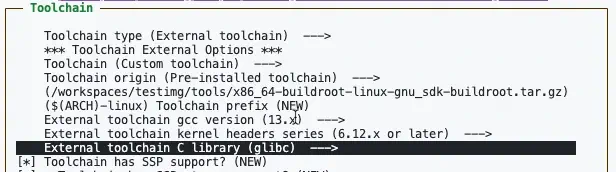
All of the options depend on how the original toolchain was configured, but there are a few options that will frequently need to be set:
| Menu item | If using the project from last week |
|---|---|
| External toolchain gcc version | 13.x |
| External toolchain kernel headers series | 6.12.x or later |
| External toolchain C library | glibc |
| Toolchain has SSP support | Yes |
| Toolchain has SSP strong support | Yes |
| Toolchain has RPC support | Yes |
| Toolchain has C++ support | No* |
| Toolchain has OpenMP support | No* |
For more complex configurations, you may need to adjust additional settings.
After settings these values, press Esc to return to the main menu. Then press Esc again to exit the configuration. When prompted, save your changes. This updates the configuration settings with values such as:
 1   BR2_TOOLCHAIN_EXTERNAL=y
 2   BR2_TOOLCHAIN_EXTERNAL_CUSTOM=y
 3   BR2_TOOLCHAIN_EXTERNAL_PATH="file://../sdks/x86_64-buildroot-linux-gnu_sdk-buildroot.tar.gz"
 4   BR2_TOOLCHAIN_EXTERNAL_GCC_13=y
 5   BR2_TOOLCHAIN_EXTERNAL_HEADERS_6_12=y
 6   BR2_TOOLCHAIN_EXTERNAL_CUSTOM_GLIBC=y
 7   BR2_TOOLCHAIN_EXTERNAL_CXX=y
 8   BR2_TOOLCHAIN_EXTERNAL_OPENMP=y
You can now build your project, and it will use the pre-built toolchain. While there are still some dependencies that Buildroot will download and build, the build process should now be significantly faster.
If you are changing the toolkit configuration in an environment that has already built the toolchain, you will want to delete the cache folder (typically $HOME/.buildroot-cache) and run a clean build to ensure that the new configuration is applied correctly. You can do this by running:
1 make -C output -j`nproc` clean allIt’s important to know that experimental features such as per-package builds are not always compatible with using an SDK. If you run into issues, you may need to disable these features or adjust your configuration accordingly.
Option 2: Use prebuilt toolchains
Want an even faster option? The easiest way to save time is to skip building the toolchain entirely and use one of Buildroot’s prebuilt toolchains. Buildroot provides prebuilt toolchains for various architectures. These toolchains are built using Buildroot itself, and they are precompiled to work with common configurations. You just need to tell Buildroot to download one of those .tar.gz bundles instead of building your own.
When you configure the toolchain, you configure the toolchain type to External toolchain and the selected Toolchain to Bootlin toolchains. You then edit Bootlin toolchain variant to select the specific prebuilt toolchain you want to use.
You can find a complete list of toolchains, their configurations, and the contents of each bundle on the Bootlin toolchains site.
Option 3: Use the cache
If you’re building with a CI/CD solution like GitHub Actions, you can save a ton of time by caching the right folders. Buildroot downloads a lot of source code and builds a lot of binaries, but most of that work doesn’t change unless your configuration does. By caching these folders, you can avoid redundant downloads and rebuilds. Some folders to consider caching:
- Buildroot’s
dlfolder - This is where Buildroot stores downloaded source code. Cache this to avoid re-downloading everything on every run.
- Buildroot’s
- The
buildandper-packagefolders in your project output directory - These contain the actual build outputs and per-package build artifacts. Caching these can save you from rebuilding packages that haven’t changed.
- The
A good strategy is to use a hash of your config files as the cache key. That way, the cache is automatically invalidated if you change your configuration, but reused otherwise. Remember that any change to the architecture or toolchain generally will require you to invalidate the cache.
Here’s a snippet showing how you might set this up in GitHub Actions:
  1     - name: Cache Code
  2       uses: actions/cache@v4
  3       with:
  4         path: buildroot/dl
  5         key: ${{ github.workflow }}-downloads-${{ hashFiles('source/configs/**') }}
  6         restore-keys:
  7           ${{ github.workflow }}-downloads-
  8     - name: Cache Compiled Code
  9       uses: actions/cache@v4
 10       with:
 11         path: |
 12           ${{matrix.platform}}/build
 13           ${{matrix.platform}}/per-package
 14         key: ${{ github.workflow }}-bin-${{runner.arch}}-${{ hashFiles('source/configs/**') }}
 15         restore-keys:
 16           ${{ github.workflow }}-bin-${{runner.arch}}-
With this setup, your CI/CD runs will be much faster, and you’ll spend less time waiting for builds to finish.
Going further, faster
These are just a few of the ways you can speed up your Buildroot builds. By using prebuilt toolchains, building and reusing the SDK, or smart caching in your CI/CD pipeline, you can significantly reduce the time you spend waiting for builds to complete. This is by no means an exhaustive list, but it should give you a good starting point to make your Buildroot experience more efficient. As you become more familiar with Buildroot and how you plan to use it, you may find additional optimizations that work for your specific use case. Give these tips a try and enjoy the extra time you save!