
Over the last few years, OpenID Connect (OIDC] has continued to grow as the preferred method for creating trusted connections between cloud services. It allows for secure authentication between services without requiring a or secret to be shared. I previously demonstrated how to use OIDC to publish OCI images to Azure from GitHub. The process itself is simple and straightforward. You just need to create a trust relationship to enable identity federation (utilizing tokens from one service to request a token for accessing resources in another).
On the GitHub side, you add the permission id-token: write to enable creating a token. On the Azure side, you configure an App Registration to accept tokens with an appropriate sub (subject) claim. During the login process, something happens and you get access to Azure resources. But what exactly is happening? In this post, I’ll walk through the process and explain how everything works. I’ll use the flow between GitHub and Azure as a specific example, but the overall flow is the same for other cloud services.
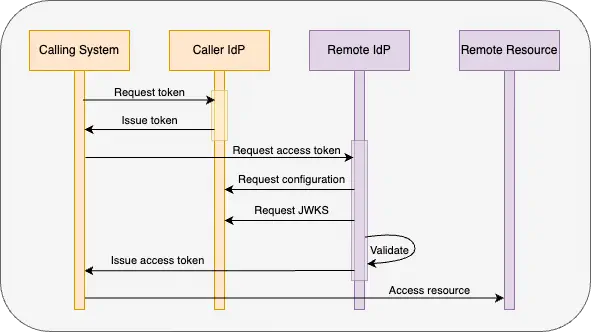
The OIDC process flow
In order for the trust to work, there’s a lot of communication that has to happen between the two systems. This protocol is
standardized by the OpenID Foundation. The process relies on a client_credential grant is broken down into the following steps:
- The calling system requests a token from its identity provider.
- The token is sent to an authorization endpoint to request access to resources.
- The authorization endpoint requests details from the well-known configuration endpoint.
- The authorization endpoint requests public key details from the JWKS endpoint.
- The authorization endpoint validates the token and its claims.
- The authorization endpoint returns an access token to the calling system.
- The calling system uses the access token to access the resources.
Creating the token
The first step is to create a JSON Web Token (JWT) which provides a set of claims about the caller. The token is digitally signed to ensure that there is no tampering. On GitHub, this process relies on adding a permission that is not normally present, id-token: write. This permission adds two additional environment variables:
ACTIONS_ID_TOKEN_REQUEST_TOKEN. A credential that can be used to request a token from the Actions provider. This value is masked (like a secret), so it’s not visible in the logs.ACTIONS_ID_TOKEN_REQUEST_URL. A URL that can be used to request a JWT that can be used for identity federation.
The ACTIONS_ID_TOKEN_REQUEST_TOKEN is actually a short-lived JWT with specific scopes and claims. To allow for skew, it’s validity is 10 minutes before the time it was created to 10 minutes after. This is why it’s important to perform any required authentication early in the job. Within the JWT is a field called oidc_extra that contains a JSON object with additional information about the current workflow run. This is used to provide additional context to the authorization endpoint. While it’s normally considered opaque data (and is subject to changes), the payload in the token looks like this:
 1{
 2  "nameid": "dddddddd-dddd-dddd-dddd-dddddddddddd",
 3  "scp": "Actions.GenericRead:00000000-0000-0000-0000-000000000000 Actions.Results:{guid}:{guid} Actions.UploadArtifacts:00000000-0000-0000-0000-000000000000/1:Build/Build/8 DistributedTask.GenerateIdToken:{guid}:{guid} LocationService.Connect ReadAndUpdateBuildByUri:00000000-0000-0000-0000-000000000000/1:Build/Build/8",
 4  "IdentityTypeClaim": "System:ServiceIdentity",
 5  "http://schemas.xmlsoap.org/ws/2005/05/identity/claims/sid": "DDDDDDDD-DDDD-DDDD-DDDD-DDDDDDDDDDDD",
 6  "http://schemas.microsoft.com/ws/2008/06/identity/claims/primarysid": "dddddddd-dddd-dddd-dddd-dddddddddddd",
 7  "aui": "{guid}",
 8  "sid": "{guid}",
 9  "ac": "[{\"Scope\":\"refs/heads/main\",\"Permission\":3}]",
10  "acsl": "10",
11  "oidc_extra": "{\"ref\":\"refs/heads/main\",\"sha\":\"398ea909a0eadd55f03e0a0d1f0df6b450d45671\",\"repository\":\"kenmuse/token-test\",\"repository_owner\":\"kenmuse\",\"repository_owner_id\":\"123456789\",\"run_id\":\"6986609053\",\"run_number\":\"11\",\"run_attempt\":\"1\",\"repository_visibility\":\"private\",\"repository_id\":\"987654321\",\"actor_id\":\"1234321\",\"actor\":\"kenmuse\",\"workflow\":\"CI\",\"head_ref\":\"\",\"base_ref\":\"\",\"event_name\":\"push\",\"ref_protected\":\"false\",\"ref_type\":\"branch\",\"workflow_ref\":\"kenmuse/token-test/.github/workflows/ci.yml@refs/heads/main\",\"workflow_sha\":\"398ea909a0eadd55f03e0a0d1f0df6b450d45671\",\"job_workflow_ref\":\"kenmuse/token-test/.github/workflows/ci.yml@refs/heads/main\",\"job_workflow_sha\":\"398ea909a0eadd55f03e0a0d1f0df6b450d45671\",\"runner_environment\":\"github-hosted\"}",
12  "oidc_sub": "repo:kenmuse/token-test:ref:refs/heads/main",
13  "orchid": "{guid}.build.__default",
14  "iss": "vstoken.actions.githubusercontent.com",
15  "aud": "vstoken.actions.githubusercontent.com|vso:{guid}",
16  "nbf": 1700880205,
17  "exp": 1700903005
18}This token is used as a bearer token to call the provided endpoint to request a token for remote resource access. For example, you could use curl to make the HTTP request and jq to parse the response to retrieve a JWT:
1curl -H "Authorization: bearer $ACTIONS_ID_TOKEN_REQUEST_TOKEN" "$ACTIONS_ID_TOKEN_REQUEST_URL" -H "Accept: application/json; api-version=2.0" -H "Content-Type: application/json" -d "{}" | jq -r '.value'This JWT can be used to authenticate to remote services and request an access token. The token includes details from the oidc_extra and oidc_sub claims. It has a validity of 10 minutes before the time it was created to 5 minutes after, so it’s important to use this value quickly. An example payload looks like this:
 1{
 2  "jti": "{unique-guid-identifier}",
 3  "sub": "repo:kenmuse/token-test:ref:refs/heads/main",
 4  "aud": "https://github.com/kenmuse",
 5  "ref": "refs/heads/main",
 6  "sha": "398ea909a0eadd55f03e0a0d1f0df6b450d45671",
 7  "repository": "kenmuse/token-test",
 8  "repository_owner": "kenmuse",
 9  "repository_owner_id": "123456789",
10  "run_id": "6986609053",
11  "run_number": "11",
12  "run_attempt": "1",
13  "repository_visibility": "private",
14  "repository_id": "987654321",
15  "actor_id": "1234321",
16  "actor": "kenmuse",
17  "workflow": "CI",
18  "head_ref": "",
19  "base_ref": "",
20  "event_name": "push",
21  "ref_protected": "false",
22  "ref_type": "branch",
23  "workflow_ref": "kenmuse/token-test/.github/workflows/blank.yml@refs/heads/main",
24  "workflow_sha": "398ea909a0eadd55f03e0a0d1f0df6b450d45671",
25  "job_workflow_ref": "kenmuse/token-test/.github/workflows/blank.yml@refs/heads/main",
26  "job_workflow_sha": "398ea909a0eadd55f03e0a0d1f0df6b450d45671",
27  "runner_environment": "github-hosted",
28  "enterprise": "my-enterprise",
29  "iss": "https://token.actions.githubusercontent.com",
30  "nbf": 1700879858,
31  "exp": 1700880758,
32  "iat": 1700880458
33}
This token can now be exchanged for an access token.
Requesting an access token
Now that the GitHub Actions issuer has created the token, it can be sent to the authorization endpoint to request access to resources. This happens automatically with some Actions, such as azure/login. It does this by sending the token to a tenant-specific endpoint and using the
client_credentials flow to request an access token from Microsoft Graph. Microsoft provides additional details on their site about using the
client credential flow. To make this work, the scope must be https://graph.microsoft.com/.default. A client ID is also required. This is the identifier associated with the App Registration in Entra. That registration will be responsible for validating the sub claim.
The POST request looks like this:
1POST https://login.microsoftonline.com/{TENANT_ID}/oauth2/v2.0/token
2Content-Type: application/x-www-form-urlencoded
3
4scope=https%3A%2F%2Fgraph.microsoft.com%2F.default
5&client_id={CLIENT_ID}
6&client_assertion_type=urn%3Aietf%3Aparams%3Aoauth%3Aclient-assertion-type%3Ajwt-bearer
7&client_assertion={JWT}
8&grant_type=client_credentials
The endpoint is responsible for validating the token and returning a JSON response that includes an access_token field if the validation is successful.
Validating the token
The validation process is surprisingly intricate. Multiple things have to be valid in order for the token to be exchanged for an access token. First, the token is separated into its three parts: header, payload, and signature. These parts are separated by a .. The parts are then base64-decoded to retrieve the contents.
Within the payload, the nbf (not before) and exp (expiration) indicate the time range during which the token is valid. If the current time is between these values, the token has not expired. An expired token is automatically rejected.
Next, the iss (issuer) claim is used to identify the source of the token. In this case, https://token.actions.githubusercontent.com. By appending /.well-known/openid-configuration to the URL, the OIDC configuration details can be retrieved. This details are required to continue validating the token. Making an unauthenticated HTTP GET call to that endpoint returns:
 1{
 2    "issuer": "https://token.actions.githubusercontent.com",
 3    "jwks_uri": "https://token.actions.githubusercontent.com/.well-known/jwks",
 4    "subject_types_supported": [
 5        "public",
 6        "pairwise"
 7    ],
 8    "response_types_supported": [
 9        "id_token"
10    ],
11    "claims_supported": [
12        "sub",
13        "aud",
14        "exp",
15        "iat",
16        "iss",
17        "jti",
18        "nbf",
19        "ref",
20        "repository",
21        "repository_id",
22        "repository_owner",
23        "repository_owner_id",
24        "run_id",
25        "run_number",
26        "run_attempt",
27        "actor",
28        "actor_id",
29        "workflow",
30        "workflow_ref",
31        "workflow_sha",
32        "head_ref",
33        "base_ref",
34        "event_name",
35        "ref_type",
36        "environment",
37        "environment_node_id",
38        "job_workflow_ref",
39        "job_workflow_sha",
40        "repository_visibility",
41        "runner_environment"
42    ],
43    "id_token_signing_alg_values_supported": [
44        "RS256"
45    ],
46    "scopes_supported": [
47        "openid"
48    ]
49}
From this configuration, the endpoint can confirm that all of the claims provided in the token are supported by the source provider. If additional claims are present, the token is rejected. It also includes details needed for validating the token signature. In this case, we see that RS256 is the only supported signature algorithm; this should match the property in the header. To validate the signature, a public key is needed. The jkws_uri provides the missing details. It points to the well-known endpoint for the JSON Web Key Sets. Retrieving the JSON data from that URI provides the details for the supported public keys:
The kid property in the JWT header identifies which of the keys should be used. If a matching key is not discovered, the token is invalid. The x5c property from the selected key set contains the certificate chain. This can be used to ensure the entire certificate chain is trusted and valid. If so, the n and e properties represent the public key details needed to validate the signature.
The header and payload are combined (separated by a .) and the SHA256 hash is calculated. The signature block is decrypted using the public key. If the decrypted value matches the hash, the token itself is valid and has not been altered.
Finally, the provided claims are compared to what’s expected by the authorization endpoint (in this case, Microsoft Entra). For Azure, this means comparing the sub (subject) claim to an expected value. If the claim matches, then the service principal associated with the App Registration is used to create an access token. This token will have access to the Azure resources based on role-based access controls (RBAC).
If the validation succeeds, an access token is returned to the caller. For Azure, this token has a lifetime that is randomized to be between 60 and 90 minutes.
Using the token
Now that the caller has an access token, it can be used to access the resources. The token just needs to be included in the Authorization header of any resource requests. The CLI tools for the various cloud providers handle this automatically. Under the covers, logins follow a similar process and convert any provided credentials to an access token. The token is then used to access any required resources.
The client_credential flow does not provide refresh tokens. As a result, the token will expire at the end of its lifetime. Because many tokens (including the Actions-provided tokens) expire within 60 minutes, tokens should be used quickly. For GitHub Actions, this can mean splitting work between multiple jobs (with each job requesting its own token).
By using a standardized approach such as OIDC, services can be more securely integrated without having to share secrets or credentials. Instead, they rely on a trust relationship and validation of claims to ensure that the right access is granted to the right resources. Hopefully this article has helped to demystify the process (and provided a better understanding of how GitHub Actions can be used to access cloud resources).