
Most IDEs focus their Git support on core workflows like cloning, committing, pushing, and pulling. As a result, most developers only know about a small portion of Git’s available features. That’s why it’s exciting to see that the July 2025 release of Visual Studio Code finally added support for a powerful feature that Git has offered for over a decade: Git worktrees.
The basics of worktrees
Let me explain this with a common example. You’re working on a new feature, but suddenly you need to fix a production issue. You have a few common ways to handle this situation:
- Commit your current work, switch to the production hotfix branch, fix the issue, push it, and then switch back to your feature branch.
- Stash your current work, switch to the production hotfix branch, fix the issue, push it, and then pop your stash when you switch back to your feature branch.
- Clone the repo to a new location, switch to the production hotfix branch, fix the issue, push it, and remove the folder.
None of these options is ideal. The first option can create a commit with incomplete or broken code, causing problems for anyone else who might need to pull the same branch later. The second option can create merge conflicts when you pop the stash, especially if the code has changed significantly since you stashed it. The last option creates a second copy of the repository, which can become confusing to manage over time.
This is where worktrees come in. A worktree allows you to have multiple working directories for the same repository, each with its own branch checked out. This means you can have your feature branch checked out in one worktree and the production branch checked out in another. You can switch between them without needing to commit or stash your changes.
Command line options
If you need to work with an IDE that doesn’t fully support worktrees or want to have complete control over the environment, you can use the Git command line: git worktree {command}. As an example, let’s assume you are working on the my-feature branch, but you need to switch to the feature-2 branch to implement a fix. You want to checkout that code to ../fixes and use that as your working directory for the branch. You would run this command:
1 git worktree add ../fixes feature-2This will create the new directory and checkout the branch feature-2. In addition, it will create the directory worktrees/fixes in your .git directory to manage the worktree and track the HEAD and ref. Git uses the last directory as the name for the worktree. For all intents and purposes, this is a standard working directory in Git. You can now modify the files, commit your changes, and push updates to the remote.
The directory can be in nearly any location, as long as Git knows how to find it. If you need to move it, the git worktree move {worktree-name} {new-location} command can be used to migrate the content. For example, to move ../fixes to ../feature-2, you can use git worktree move fixes ../feature-2. Git will move the directory and update the file worktrees/fixes/gitdir to point to the new location. You’ll notice that the name – fixes – continues to be used even after the move.
What if you accidentally move the directory yourself and Git can’t find it? You can use git worktree repair {path} to fix the issue. Instead of a directory called .git, worktrees use a file that contains the path to the worktree’s configuration within the source Git repository. The repair command uses this to find the original worktree’s gitdir and update it to point to the new location. You can also run this command against the main worktree (the place with the .git directory) if you’ve moved that. This will correct the paths to each of your current worktrees. You can even use the command if you’ve moved both to rebuild the connection.
When you finish with the fixes worktree, you can use git worktree remove fixes to remove the folder and the worktree details. Git will also periodically look for worktree directories that are missing and older than three months, then automatically remove them. If you need to prevent this cleanup (for example, you have the worktree on a removable drive or network share), you can use git worktree lock to prevent Git from automatically pruning that worktree.
If you want to see what worktrees you’ve configured, Git provides the git worktree list command. This returns a formatted list of all worktrees, their paths, branches, and current HEAD SHA in a tabular format.
If you prefer a flat format for scripting, you can use --porcelain to get the information provided on separate lines (with a newline between records):
Many of these behaviors are configurable or have additional options, so you may find this interesting to explore!
Working with VS Code
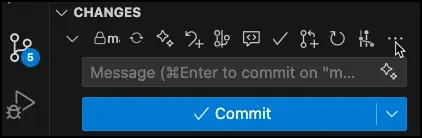
Now that you understand how to use worktrees, let’s explore how they work in VS Code. I won’t dive too deep here since the release notes provide a good overview of what’s available. In the Source Control view under both Repositories and Changes, you’ll find an expansion menu:
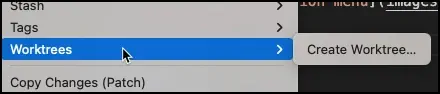
Underneath this, you now have the Worktrees option and the ability to create a worktree:
VS Code displays your worktrees under Repositories, letting you quickly select a worktree, commit changes, and delete worktrees. You also have the option to switch to the worktree and work on it in either the current window or a new window. As you can see, this doesn’t cover everything you can do with worktrees from the command line, but it handles the most important features!
Submodules
Technically, even though Git has offered this feature for many years, Git still documents multiple checkout as experimental. Part of the reason is that it has known issues when working with submodules. Git recommends not using this feature when your repository uses submodules. This (and the issues it can create for migrations) are definitely considerations when determining whether submodules are the right choice for your project.
Other ways to use worktrees
I should also mention that worktrees have many other uses. When you use them properly, they can simplify your development workflow and support concurrent work against your repository. For example, you can use worktrees to:
- Experiment with new features (or AI) without affecting your current working branch
- Test multiple ideas simultaneously to find the best solution
- Review code changes and test improvements without losing other work you have in progress
- Keep the main branch checked out and available for comparing to other branches
Git worktrees are a powerful tool that can transform how you approach concurrent development, eliminating the friction of switching between branches and enabling truly parallel workflows. Now that you understand the basics, it’s time to experiment with worktrees in your own projects — you might just find that they become an indispensable part of your development toolkit!