
Imagine you’re deep in a feature branch, writing code, when you realize you also need to refactor some tests and update the project’s documentation. Traditionally, you’d either context-switch between tasks yourself or wait until one was done before starting the next. With Copilot CLI sessions, you can hand those tasks off to parallel agents that work autonomously in the background on your local machine. But here’s the catch – if multiple agents (or an agent and you) are editing the same files at the same time, things can get messy fast.
That’s where VS Code’s isolation modes come in. When you create a Copilot CLI session, VS Code lets you choose between workspace isolation and worktree isolation. This choice essentially determines whether the agent operates directly in your working directory or using its own copy of the codebase. Getting this right is the key to effective agent orchestration – running multiple agents safely and simultaneously without conflicts.
What are Copilot CLI sessions?
Copilot CLI sessions are background agent sessions that run on your local machine using the Copilot CLI agent harness. Unlike a local agent that runs inside VS Code’s editor process and stops when you close the window, a Copilot CLI session runs independently. That’s right – you can close VS Code and go grab a coffee while the agent finishes its work.
You start a session from the Chat view by selecting Copilot CLI from the Session Target dropdown or by running the Chat: New Copilot CLI command from the Command Palette. You can also hand off an in-progress local agent conversation directly to a Copilot CLI session. The full conversation history and context carry over, so the background agent picks up right where you left off.
These sessions work best for tasks with a well-defined scope: implementing a feature from a plan, creating multiple variants of a proof of concept, or applying clearly specified fixes. And because each session is independent, you can launch several at once to tackle different tasks in parallel.
A quick refresher on Git worktrees
If you’re not familiar with Git worktrees, the short version is this: a worktree lets you have multiple working directories for the same repository. That means each directory can have a different branch of code checked out. It shares the same .git data as your main checkout, so everything stays connected – branches, remotes, history – but each worktree has its own independent set of files. As a result, each folder can be used to independently edit code, run builds, or execute tests without affecting the others. This branch-level isolation is exactly what makes them so useful for parallel agents.
I covered this in detail in an earlier post, including the command-line options and how VS Code’s Source Control view supports them natively.
How VS Code provides isolation
When you create a Copilot CLI session, VS Code prompts you to choose an isolation mode. VS Code handles all the coordination – setting up the environment, creating worktrees if needed, and starting each session in the right working directory. The CLI agent simply works with whatever directory it’s given.
You have two choices:
- Workspace isolation
- The agent operates directly in your current workspace. Changes are applied in place, just as if you were making them yourself. All three permission levels are available – Default Approvals (you approve each action), Bypass Approvals (the agent acts without approval), and Autopilot (the agent acts freely with expanded capabilities) – so you can decide how much oversight you want. Think of it as a shared desk – you and the agent are working on the same files, so you need to coordinate.
- Worktree isolation
- VS Code creates a Git worktree in a separate folder for the session, with its own branch. All changes stay in that worktree until you’re ready to review and merge them. The permission level is automatically set to Bypass Approvals and can’t be changed, since the agent can’t touch your working copy – it’s operating in a completely separate directory. Worktree isolation is like a private office – the agent has its own copy of the codebase, and you don’t see its changes until it’s done and you decide to look.
Worktree isolation requires your workspace to be a Git repository, since the underlying mechanism depends on git worktree. If your project isn’t in Git, workspace isolation is your only option.
After the agent finishes
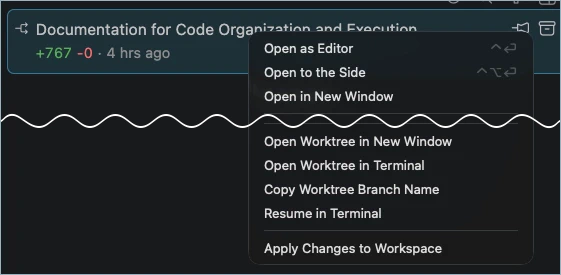
When a worktree-isolated session completes its task, the changes live on a separate branch inside the worktree. The agent auto-committed its work at the end of each turn (a single prompt-and-response cycle), so you’ll find a clean commit history showing exactly what it did and when. To get to those changes, you’ll need to open the worktree by right-clicking the session in the Chat view and selecting Open Worktree in New Window. This opens a new VS Code window with that worktree as the workspace, so you can review the changes in isolation from your main branch. You can also copy the branch name from the session details and check it out in your main window if you prefer.
Alternatively, you can browse all of your worktrees in the Source Control view’s Repositories explorer by enabling the scm.repositories.explorer setting. This setting also requires you to configure scm.repositories.selectionMode to single so the Changes view doesn’t become overwhelming by showing every repository at once.
Once you open the worktree, you can inspect the diffs in the Source Control view or browse the commits. If the agent’s changes look good, you merge the branch into your working branch – either locally with git merge or by pushing the branch and creating a pull request for a team review.
Once the changes are merged, you’ll want to clean up. This means removing the worktree directory and its Git metadata. You can do this in VS Code or from the command line:
1 git worktree remove {path-to-worktree}You can also delete the worktree from VS Code’s Source Control Repositories view. In both cases, the cleanup is currently a manual step. The worktree and its folder persist after the session ends, even if you’ve already applied the changes. This is a known friction point, and there’s an open issue to have VS Code automatically clean up worktrees after changes are applied. The community has suggested several approaches, but for now, it’s something to keep in mind as part of your workflow. Otherwise, you’ll end up with storage bloat from your old worktrees.
Running parallel agents
Because each worktree-isolated session gets its own branch and directory, you can run multiple sessions simultaneously without any of them interfering with each other or your current work. When they finish, you review and merge each branch independently, just like you would with any other feature branch.
The key is scoping each session to a distinct area of the codebase. If two agents need to modify the same files, you’ll still end up with merge conflicts even with worktree isolation – the conflicts just surface during the merge step rather than during editing. Give each session a focused task (one refactors the API layer, another updates tests, a third writes documentation) and the parallel workflow stays clean.
Contrast this with workspace isolation, where two sessions would be writing to the same files in your working directory simultaneously – a recipe for conflicts and broken code.
Practical tips
Here are a few recommendations as you start working with isolation modes:
- Consider worktree isolation for any task you can hand off and walk away from. It’s safer and enables running parallel agents without coordination overhead.
- Use workspace isolation when you want an interactive experience – where you’re actively watching and guiding the agent’s changes in real time as part of a collaborative editing session.
- Take advantage of the plan agent handoff workflow. Start a conversation with VS Code’s plan agent – a built-in agent designed for breaking down tasks before implementation – to refine the requirements interactively, then hand off to Copilot CLI for autonomous execution.
- Keep in mind that worktree creation can fail in certain environments. I’ve seen issues in dev containers where VS Code is unable to create the worktree, immediately falling back to workspace isolation. Opening the same workspace outside of a dev container often resolves the issue.
- Note the current limitations. Copilot CLI can’t access all of VS Code’s built-in tools, doesn’t have access to extension-provided tools, and can only use local MCP servers that don’t require authentication. If your task needs these capabilities, stick with a local agent session instead.
Wrapping up
Worktree isolation transforms Copilot CLI from a single-threaded assistant into a framework for running parallel agents across your codebase. VS Code handles the setup and isolation so you can focus on defining the work rather than managing the environment. Once the agents finish, you review, merge, and clean up, just like any other branch workflow.
If you haven’t tried running multiple Copilot CLI sessions at once, start with two or three well-scoped tasks. You might be surprised how productive it feels to come back from a break and find a set of clean, reviewable branches waiting for you.